

Force Multipliers
Practical Tools, Useful Systems
Dear Homesteading Elders Family,
I have been thinking carefully about how to make these newsletters more useful, more sustainable, and easier for readers to follow.
Until now, I had been creating separate free and paid newsletters, sometimes with completely separate handouts. While that allowed me to offer different levels of information, it also created a tremendous amount of extra work behind the scenes. More importantly, I realized it was not always the clearest format for the community.
Going forward, I am moving toward a better structure.
Each newsletter will begin with a useful free section you can put to work right away. In the paid section - beyond the paywall, there will be additional information on the topic of the newsletter with expanded instructions, examples, worksheets, checklists, or additional techniques—so you can decide whether it would be helpful for your household, garden, animals, or homestead.
I believe this will serve the community better. Free readers will still receive real help, and paid subscribers will have clearer access to the deeper guides and planning tools that save research time and help turn good ideas into workable systems.
It also makes the newsletter more sustainable for me to create, which means I can keep building richer, more useful education without creating two separate topic projects.
In this newsletter, we are going to talk about choosing tools and building simple systems that make work more efficient. Sometimes that means finding a well-designed tool. Sometimes it means building a simple aid from materials already available. Either way, the goal is the same: make the work fit the real situation instead of wasting strength, time, money, or motion.
In today’s free section, I will use the CobraHead Weeder and Cultivator as a real-life example of how to evaluate a tool before adding it to your garden system. CobraHead kindly sent me their Ultimate Garden Cultivator Deal to try, and I want to share it with the whole community because I am genuinely impressed with what they have created.
Then we will look at a simple DIY project: a flat 2x4 dolly with wheels that can be modified for many different homestead jobs.
Because sometimes the best answer is not to work harder.
Sometimes the best answer is to redesign the system.
Choosing Tools That Work With the Way You Garden
Before we talk about CobraHead, I want to step back and talk about how to choose any tool.
When you are shopping for tools, accepting a donated tool, comparing options, or deciding whether something you already own still deserves a place in your shed, it helps to have a clear set of questions in mind.
A good tool is not simply one that looks impressive.
A good tool is one that works well in the hands of the person actually using it.
That matters because homesteading work is not done in a catalog photograph. It is done in real weather, real soil, real barns, real gardens, real kitchens, and on real schedules. The right tool should match the job, the user, the storage space, the budget, and the way the work actually happens.
When choosing a tool, think about:
grip strength
lifting ability
reach
hand fatigue
balance
weight
ease of storage and access
whether you can carry the tool to where it is needed
whether you can use it safely for more than a few minutes
whether it saves motion or creates more motion
whether it works from the position you actually use: standing, seated, kneeling, or from a wheelchair
A tool may be high quality and still not be the right match if:
it is too heavy
the grip is too small or too big, too slick, or too hard
it requires more wrist strength than you exert
it requires too much bending or overreaching
it requires complicated maintenance
it creates pain after a short time
it is too complicated to use when tired, cold, or in a hurry
it is sharp, powerful, or awkward in a way that makes it hard to control
it is not maintained or repaired properly
This is also where quality matters.
A tool may be inexpensive at the register, but if it is low quality, breaks quickly, rusts easily, bends under pressure, or has to be replaced again and again, it may become an expensive tool over time.
There is a reason people say, “You get what you pay for.”
That does not mean the most expensive tool is always the best choice either. It means small design details often become big differences during real use: a straight handle instead of an ergonomically shaped one, thinner metal, rougher edges, weaker fasteners, poor balance, awkward angles, or a handle that causes strain during extended use.
A tool that feels “fine” for two minutes may feel very different after twenty minutes in a garden bed.
So the question is not only:
Can I afford this tool today?
The better question is:
Will this tool still be useful, comfortable, safe, and durable after repeated use?
Now let us apply that thinking to a real example.
Tool Example: The CobraHead Weeder and Cultivator
CobraHead kindly sent me their Ultimate Garden Cultivator Deal to try. I was not paid to say anything specific about it, and they did not tell me what to write.
I am sharing it here for two reasons. First, this tool package gives us a useful way to talk about choosing garden tools wisely. Second, I am genuinely impressed with it. When I find a tool or company that appears to understand how much design matters to real gardeners, I want the Homesteading Elders community to know about it.
The package includes three distinct tools:
the Original CobraHead Weeder and Cultivator
the CobraHead Mini Weeder and Cultivator
the CobraHead Long Handle Weeder and Cultivator
At the time I checked, CobraHead listed this three-tool package at $159.00, compared with $172.00 if the three tools were purchased separately. Prices can change, so always check the current listing before ordering.
I appreciate what CobraHead has done here.
It is one thing to make a garden tool. It is another thing to make a tool system that offers different ways to work: close to the soil with hand tools, in tight spaces with a smaller tool, and from a standing position with a long-handled tool.
That kind of design matters.
It gives gardeners more choice. And choice is powerful.
Why Handle Length Matters
One of the strongest things CobraHead offers is choice in handle length.
Their Long Handle Weeder and Cultivator comes in three overall tool lengths:
Small: 56 inches — suggested for gardeners under 5’3”
Standard: 62 inches — suggested for gardeners 5’4” to 6’1”
Tall: 68 inches — suggested for gardeners over 6’2”
CobraHead also notes that length choice is subjective to the individual user, but that these ranges work for most of their customers. (Website)
That may sound like a small detail.
It is not.
Handle length affects posture, reach, shoulder strain, wrist angle, balance, control, and how much bending the tool actually saves. A handle that is too short may pull the gardener into bending. A handle that is too long may feel awkward to steer, especially in tight garden spaces. The right handle length helps the tool become an extension of the gardener instead of a problem to manage.
The version I received is the Standard, which is the middle length.
I especially want to commend CobraHead for being thoughtful enough to offer different handle lengths. Too many tools assume every gardener has the same height, reach, balance, strength, and working position. That is not real life.
Real gardeners work standing, kneeling, sitting, leaning, reaching from paths, working from raised beds, and sometimes gardening from a wheelchair.
A company that gives people more than one size gives gardeners a better chance of finding a tool that actually fits.
Match the Tool to Your Working Position
Before buying or keeping a long-handled tool, think about where your body will actually be when you use it.
Will you be standing beside a ground-level bed?
Sitting on a garden stool?
Working from a wheelchair?
Reaching into a raised bed?
Working across a wide bed from one side?
Using the tool from a path, porch, greenhouse aisle, or narrow walkway?
Those details matter.
A tool that works beautifully for a standing gardener may feel clumsy for someone working seated. A tool that works well in a raised bed may not give enough reach for a ground-level bed. A tool that is perfect in open soil may be awkward in a tightly planted bed.
For wheelchair gardening, handle length depends heavily on the garden setup.
If you garden from a wheelchair and work primarily in raised beds, a shorter handle may give better control and keep the tool from feeling oversized or awkward. If you garden from a wheelchair and work in ground-level beds, a longer handle may help create a lower working angle between you and the soil, reducing the need to lean as far.
The right answer depends on the person, the chair, the height of the beds, the distance between the path and the planting area, shoulder comfort, grip, and how much control the gardener has at the end of the tool.
That is why tool selection should never be based only on whether a tool is “good.”
The better question is:
Is this tool good for the way I actually garden?
What Makes the CobraHead Design Useful?
The CobraHead tools are built around a narrow, curved blade. CobraHead calls it a steel fingernail®, and that image makes sense. It is designed to become an extension of the hand so the gardener can weed, cultivate, dig, plant, and work soil with more precision than many broader tools allow. (Website)
The Original and Mini tools are hand tools. The Mini is less than half the size of the Original and is meant for tight spaces and working near delicate plants. (Website)
The Long Handle version brings that same general blade idea into a tool that offers reach. CobraHead describes it as allowing gardeners to do a lot of gardening without bending over. They also note that its single blade can cut hard soil with less resistance than a wide hoe or multi-tined tool and that it can be useful in tightly spaced crops, around drip irrigation, and for cutting weeds at ground level. (Website)
That combination is exactly why this tool belongs in a Homesteading Elders conversation.
It is not only about weeding.
It is about asking:
Can this tool reduce unnecessary bending?
Can it reduce the number of tools I carry?
Can it work in tight spaces?
Can it help avoid disturbing nearby plants?
Can it serve more than one purpose through the season?
Can I choose a handle length that better fits my body and working position?
A tool earns its place when it solves more than one real problem.
A Multipurpose Tool Helps the Garden and the Budget
CobraHead describes these tools as useful for many garden jobs, including weeding, cultivating, scalping, edging, digging, furrowing, planting, transplanting, de-thatching, and harvesting. (Website)
That matters because every extra tool has a cost.
A tool has to be bought.
It has to be stored.
It has to be carried.
It has to be cleaned.
It has to be maintained.
And if it is not where you need it, you have to walk back and get it.
For people working with a tight budget, a tool that can handle several jobs may mean fewer tools to purchase.
For people managing a busy garden, a tool that handles several jobs may mean fewer tools to carry, fewer trips back and forth, and less clutter in the work area.
A multipurpose tool does not replace every tool in the shed. But when it is well designed and matched to the gardener, it can simplify the work.
That is part of what makes a tool worth considering.
Learn the Motion Before You Judge the Tool
One thing I want to say about any unfamiliar tool is this:
Give yourself time to learn the motion.
A CobraHead does not move exactly like a standard hoe, rake, shovel, or trowel. The curved blade and narrow working edge are part of what make it useful, but they also mean the gardener may need to practice angle, pressure, and placement.
CobraHead includes helpful support resources on their website, including How-To Tips, a Short Handle and Long Handle FAQ, How-To Videos, and downloadable instructions for the Long Handle tool.
I appreciate that because a good tool becomes more useful when the company helps people understand how to use it well.
What Are the Limitations of This Tool?
This is one of the most important questions to ask about any tool.
A useful tool still has limits.
CobraHead is clear that the Long Handle blade is thin, sharp, and strong, but not indestructible. They specifically say it is not designed for pulling dandelions out of the lawn or for removing large plants and roots. (Website)
I appreciate that warning.
A tool earns trust when the company tells you what it is not for.
That helps us match the tool to the work instead of forcing one tool to do every job. If the task is removing large roots, prying out woody plants, or yanking deep dandelions from a lawn, another tool is the safer and wiser choice.
A smart tool system does not mean one tool does everything.
It means the tool, the job, and the gardener match each other.
Questions to Ask Before Buying or Keeping Any Garden Tool
The CobraHead is today’s example, but these questions apply to every garden tool you own or consider buying.
Before adding a tool to your garden system, ask:
Can I grip it comfortably?
Can I use it without overreaching?
Does it reduce bending or increase it?
Is the handle length right for my height and working position?
Can I use it standing, seated, or from the position I actually work from?
Is it light enough for repeated use?
Does it save motion, or does it create more work?
Does it work in the tight spaces where I need it?
Can it serve more than one purpose through the season?
Is it well made enough to last?
Are the handle, blade, fasteners, and working angle built for repeated use?
Can I clean, sharpen, store, and maintain it?
Do I know its limitations?
A tool may be popular and still not be right for you.
A tool may be inexpensive at first and still become expensive if it breaks, bends, rusts, hurts to use, or has to be replaced more than once.
A tool may cost more and still be the better value if it is safer, more durable, better balanced, easier to grip, more comfortable over time, and useful for several jobs.
The larger lesson is this:
Do not ask yourself to adapt to every tool. Learn to choose tools that fit the way your body, garden, and homestead actually work.
If you decide to order from CobraHead because you heard about the tools here, I would be grateful if you mentioned Homesteading Elders. It helps companies understand that our community values practical, well-designed tools that help people keep growing.
A Simple DIY Dolly: Let Wheels Do the Carrying
Some of the most useful homestead tools are the ones you can build yourself, adjust over time, and modify for the work you actually do.
A simple flat dolly is a good example.
A dolly is a low platform on wheels. Instead of carrying a heavy or awkward item across the garage, barn, shed, porch, greenhouse, or garden work area, you can lift one end just enough to slide the dolly underneath, lower the item onto the dolly, center the load, and roll it where it needs to go.
The principle is simple:
Do not carry what can roll.
This kind of dolly can be useful for moving:
a 50-pound sack of feed
an 80-pound bale of hay or straw
garden soil or amendments
heavy totes
planters
buckets grouped in a crate
a cage or kennel with small livestock
small cage frames
awkward boxes
tools or supplies that are not impossible to lift, but are awkward enough to make the job harder than it needs to be
Many strains and injuries happen because something is awkward, low to the ground, too far away, repeated too many times, or carried when it could have been rolled.
A dolly changes the job.
A Simple 2x4 Dolly Frame
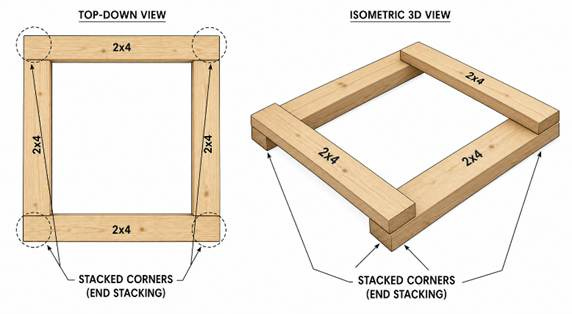
This first diagram shows the basic frame.
Four pieces of 2x4 or 2x6 lumber are arranged into a simple rectangle with overlapped corners. Two boards run one direction, and two boards run the other direction. This creates a low frame with space underneath for mounting wheels.
This design is intentionally simple. The goal is not fancy carpentry. The goal is to make a useful work aid that can be adjusted for different tasks.
There is no single perfect dolly size. The size depends on what you plan to move.
Some common dolly sizes are:
18” x 12” for smaller boxes, totes, or compact items
24” x 16” for medium-size household, garden, or barn items
30” x 18” for larger boxes, feed sacks, or awkward items that need more support
Those measurements are starting points, not rules.
If the object is longer, you may need a longer dolly. If the object is especially long or awkward, it may be safer to build two dollies and support both ends instead of trying to balance the whole item on one short platform.
Adding Wheels

This second diagram shows the same basic frame with wheels mounted near the four corners.
Casters and wheels are rated by the manufacturer. Read the weight rating before buying them, and choose wheels rated for more than the heaviest load you expect to move. Remember to count the weight of the dolly itself, not just the item sitting on top.
A useful safety habit is to plan as if only three wheels may be carrying the weight at a time, because floors and ground surfaces are not always perfectly even. Caster Concepts gives this same guidance when calculating caster capacity. (Caster Concepts)
Before choosing wheels, ask:
What is the heaviest item I realistically plan to move?
Is it a 50-pound sack of feed?
An 80-pound bale of hay or straw?
A heavy tote?
A planter full of damp soil?
A cage or kennel with small livestock?
Will I use this on smooth concrete, plywood, packed dirt, gravel, grass, or across thresholds?
Do I need larger wheels to cross cracks, doorway lips, or rough ground?
Do I need wheels that lock while I load or unload?
Would four swivel wheels help me turn in tight spaces?
Would two fixed wheels and two swivel wheels help it track straighter?
The weight you can safely roll depends on the wheels, the wood, the fasteners, the surface, the stability of the load, and how the dolly is used. The safest approach is to match the wheels to the job instead of assuming any set of wheels will do.
Wheel Size: Large vs. Small
Small wheels can work well on smooth, hard surfaces.
They may be enough for:
smooth concrete
plywood floors
shop floors
garage floors
smooth shed floors
But small wheels are not very forgiving. They can stop suddenly on a crack, catch on a doorway lip, sink into soft ground, or make the dolly much harder to push.
Larger wheels are usually better when the surface is uneven. They roll over small cracks, thresholds, doorway lips, packed dirt, or rough ground more easily than small wheels.
Colson’s caster guide explains that heavier loads generally need larger wheels, floor conditions matter, and larger wheel diameter usually rolls more easily. (Colson)
The rougher the surface, the more important wheel diameter becomes.
Wheel Material: Hard vs. Soft
Wheel material matters too.
Harder wheels usually roll more easily on smooth, hard floors. They may be a good choice for concrete, plywood, shop floors, garage floors, and other firm surfaces.
Softer or cushioned wheels are often better for rougher ground, outdoor use, or situations where you want more shock absorption. They may handle uneven surfaces better, but they can also be harder to push under a heavy load.
Hamilton’s caster guide notes that soft tread wheels can be useful for rough floors, outdoor use, or cushioning loads, but may be harder to push manually when heavily loaded. (Hamilton Caster)
In plain homestead language:
Surface
Wheel Direction to Consider
Smooth concrete or shop floor
Smaller to medium hard rubber, polyurethane, or other smooth-rolling wheels
Plywood floor or smooth shed floor
Hard or medium wheels that roll easily
Thresholds or small cracks
Larger diameter wheels
Packed dirt or rough barn floor
Larger, softer, or more cushioned wheels
Grass, gravel, or uneven outdoor ground
Larger outdoor-style wheels; small hard casters will usually fight you
Delicate flooring
Softer wheels or floor protection may help reduce marks
No wheel is perfect for every surface. Choose specifically for the terrain you will actually use the dolly on.
Modifying the Dolly for the Job
The open 2x4 or 2x6 frame may be enough for some objects, especially if the item is large, flat, and stable.
But one of the best things about a simple dolly is that it can be modified.
Carpet or carpet remnant can be glued or stapled to the top rails when you want a little padding and grip. This can be helpful for moving scratchable items such as furniture, painted pieces, finished wood, or anything you do not want scraped by bare lumber.
A piece of plywood can be cut to fit the top if you need a solid platform. This is useful for feed sacks, buckets, boxes, smaller totes, or anything that might sag through the open space in the middle.
Additional slats of equal length can be added across the opening if you want support without using a full plywood top. This can help with bags, bales, crates, or objects that need more contact underneath.
Side boards or removable side rails can help contain cargo. This may be useful when moving several smaller items at once, moving buckets or jars, or transporting a kennel with small livestock for medical care, grooming, harvesting, or relocation. Sides help contain cargo, but they do not make an unstable load safe.
Rubber matting can be added when you need more grip for wet, slippery, or oily objects. A remnant of stall mat, rubber stair tread, or another heavy rubber remnant may help keep some loads from sliding.
Handles can make the dolly easier to control. A rope handle may work for light pulling on smooth surfaces. A wood handle can be attached for more control. A metal handle, salvaged cart handle, or removable handle may be useful if the dolly is used often or for heavier tasks.
Tie-down points can be added with eye bolts or other rated hardware if you need to secure awkward cargo with straps or rope.
Corner blocks or stops can help keep a crate, tote, or kennel from sliding off the platform.
A two-dolly setup can help with long items such as lumber, panels, cage frames, or long planters. One dolly supports one end, and the second dolly supports the other.
The modifications are nearly endless.
The important question is:
What problem am I trying to solve?
If the item scratches easily, add padding.
If it sags, add a solid top or slats.
If it slides, add grip.
If it shifts, add sides, stops, or tie-downs.
If it is long, use two dollies.
If it is unstable, stop and rethink the job.
Simple Materials
For a basic version, you may need:
four pieces of 2x4 or 2x6 lumber
four properly rated casters or wheels
screws or bolts suited to the caster plates
washers, if needed
drill or driver
sandpaper
optional plywood top
optional carpet remnant
optional rubber matting
optional extra slats
optional side boards
optional rope, wood, or metal handle
optional eye bolts or tie-down points
optional corner blocks or stops
Use fasteners appropriate for the wheels and the wood. If the caster plate has holes for bolts, bolts with washers may be stronger than small screws. If you are not sure, ask someone experienced at the hardware store, a carpenter, a mechanically minded neighbor, or a trusted handy family member.
Basic Build Steps
Decide what size dolly fits the items you most often move.
Cut four pieces of 2x4 lumber: two longer side pieces and two shorter end pieces.
Arrange them in a rectangle with stacked corners, as shown in the diagram.
Fasten the corners securely.
Add a plywood top, slats, carpet, rubber, handles, side boards, stops, or tie-down points if your planned use calls for them.
Mount one properly rated wheel near each corner.
Sand rough edges.
Test the dolly first with something light.
Increase weight gradually only after you know it rolls, steers, and stays stable.
How to Use It
Clear the path before you load the dolly.
Place the dolly near the item. If the dolly does not have locking wheels, chock at least two wheels before loading so it does not roll away while you are balancing the load. A rock, wooden wedge, doorstop, scrap piece of lumber, or another sturdy object can work as a simple wheel chock.
Lift one end of the item only as much as needed, slide the dolly underneath, and lower that end slowly onto the dolly.
Once part of the weight is resting on the dolly, shift or slide the item until it is centered and balanced on the dolly platform. This should be easier now because the dolly is carrying a portion of the weight.
Keep fingers and feet away from pinch points while you adjust the load.
Remove the chocks before moving the dolly. Push or pull slowly, and watch for tipping, sliding, binding, or the wheels catching. Stop immediately if the load begins to shift or becomes hard to control.
This is especially useful when an item is awkward, a repetitive task, low to the ground, or easier to control on wheels than in your arms.
Important Safety Limits
A homemade dolly is useful for stable loads on suitable surfaces. Do not use it for unstable, top-heavy, shifting, extremely heavy, or dangerous items. Do not stand on it. Do not ride it. DO NOT USE A DOLLY ON STEEP SLOPES!! Stop immediately if the load tips, slides, binds, or becomes hard to control.
A simple dolly is a small project that can give big results.
When a job is hard, we have the power to create a simple system that becomes a force multiplier.
In the free section, we looked at two practical ways to change the work: choosing a garden tool with better design and building a simple dolly so more jobs can roll instead of being carried.
In the paid section, we will continue with two more simple-machine ideas that are especially useful around a homestead: ramps and come-alongs/ratcheted pulleys.
Ramps can help move loads across height changes instead of lifting them straight up. Come-alongs can help move, tension, or reposition objects with controlled pulling force. Both can work alongside carts, dollies, crates, kennels, feed, equipment, fencing, animal-care areas, and small homestead projects.
We will look at where these tools are useful, what questions to ask before using them, and what safety limits need to be respected.
If this kind of practical systems-thinking is useful to you, I invite you to become a paid subscriber and continue into the deeper section, where we will look closely at ramps and come-alongs and how they help us work smarter, not harder.
